TVR T350
TVR T350

MENU
WORKSHOP 2
Workshop 1 was built some 20 years ago, and for a while was sufficient for my needs. As the business started to grow, it became necessary to start thinking about another building, to accommodate the increase in work and tooling. Fortunately, there was enough space on my property to build another workshop, and so Workshop 2 was created. I haven't shown the building construction pictures, although I have all the build sequence, should I choose to upload them in the future. The story picks up with the exterior being completed, with the main double doors fitted and the resin courtyard freshly laid.


The floor of the building was just the concrete base, which although it had 6" of insulation incorporated inside, it was a rough finish and needed to be screeded. The next two pictures show the floor before and after the screed. Eventually the floor will be tiled with porcelain tiles, but there is a lot to do before that happens.


Screed takes a while to dry, so before anymore work can be done, it needs to have hardened enough to walk on. Once dry enough, I set about constructing the walls of what was to become a music studio, which will also double up as the office. The next set of pictures shows the setting out and construction of the walls, with the sound reflective doors and windows. The walls will eventually have acoustic insulation installed which will keep the heat (and sound) in. The studio ceiling will also have 6" of acoustic insulation above it, which should help even more. The building has five ring mains, three for the workshop area and two for the studio. The studio power ring has additional isolation, to try and keep it as noise free as possible, minimising noise through the amplifiers.
Here is the initial setting out of the walls, which are made of 4"x2" tanalised wood. You can see the first upright anchored to the wall thus providing a datum for the rest of the structure. It was very important for the whole room to be square, as the porcelain tiles will meet the edge of the finished wall, and the cabinets will meet on both ends of the room, and there is no adjustment on the work tops which obviously need to run exactly square to each other. The last few pictures show the cabinets, and you will see what I mean.


The stud walling has been completed and the wiring has been installed. There will be a music system in the workshop space with four speakers on the walls and a sub, connected to a separate amplifier. Once the wifi is fitted, there will be an option to channel the music from a number of different sources. In addition to the music studio wiring, the workshop ring is also integrated Into the stud walls. There will be cabinets each side of the studio which will have under cabinet lighting and outlet sockets, so all of that needs to be installed at this stage. The next job will be to fit the acoustic plasterboard to the outside of the structure and then the main insulation can go in.


To the left you can see the metal reflective material on the inside of the plasterboard, which helps with any moisture and reflects the sound. Below shows the finished plasterboard with the various wires poking out for the rings and lights. The next task is to install the acoustic insulation, which is incredibly dense and heavy. I cut it all to fit with a panel saw, it was like cutting foam. Once it was all installed, if you walked into the room, shut the doors, it was if your ears had been turned off. Complete silence, a very odd experience. Once the internal plasterboard was fitted, then there was some sound reflection, but this is to be expected.


The next few pictures show the walls plastered inside and out. It is always a great feeling when the walls are plastered, it feels like you are getting there and the end is in sight. However, there is still along way to go, but the end result should be worth it. It all needs to dry before the next stage which will be the light pelmets, which are going to have a ring of LED lighting all the way around the ceiling. The plan is for the light to wash the ceiling with colour, which will also give me an option to change the colour if desired.


I had to install some form of lighting in order to do the pelmets, so I painted the ceiling and fitted the track lighting. The idea was for a light to be allocated to each keyboard stack, along with the office desk. The beauty of these types of lighting systems is that it's completely flexible, and the lights can be moved as required. The big white panel at the end is an infra red heater, this will be used in addition to a Dyson fan heater. I'm hoping that there will be enough heat during the cold winter months.


The walls have been painted, the pelmets constructed and a new black carpet fitted. The room is constructionally finished and the keyboard stands/keyboards will be installed bit by bit. There is quite a lot of equipment to be fitted and wired up, which includes a beer fridge disguised as a guitar amp. The office desk is set up, and various keyboards have been set up enough to play.


A new porcelain tile floor has been laid in the workshop area, with 600x300 anthracite tiles. Nearly a quarter of a tonne of glue was used during the laying, as the floor wasn't as level as it should have been, but the final result was perfect. You can just see the bottom of the loft ladder which has been fitted. The whole of the roof space has been floored out, and insulation fitted to the roof area. The space above is sealed which forms an important part of the heating system which I will show at the end.

Once the floor had been grouted, it was sealed so that if there were ever to be a liquid spillage, it wouldn't soak Ito the grout and stain the floor. And so on to the nice part of the project, the finishing details. The ceiling was given a fresh coat of paint, as were the walls. The speakers were fitted along with a new large display clock. A blind was made in the same colour as the floor, and the window sill and metal beam also painted to match.


The colour of the white toolbox was matched to the cabinets, hydraulic lift and the doors of the workshop, so that everything was the same colour. I wanted it to be a uniform look with the grey, black and white all to be matching in the two rooms. The next job was the installation of the cabinets. What appeared to be a straightforward job, turned out to be anything but. It took over a week to correctly fit all the units, but it's all square, and fits perfectly. There are LED light strips on the top of the wall cabinets, and white LED lights underneath. I think the end result was worth it, and looks the part.
There is still one more cabinet to fit to the above picture on the left hand side. This will be a 300mm wide unit and will be like a pull out larder that you would get in a kitchen. Unfortunately, Dura who make the cabinets, don't make it exactly as I wanted. So they are going to make the outer part of the cabinet which has a virtical sheet inside. This is supposed to be a tool hanging set up, but I am going to modify it to have shelves for all the detailing products. There is a lead time to the manufacture of the unit, so it will be fitted shortly.


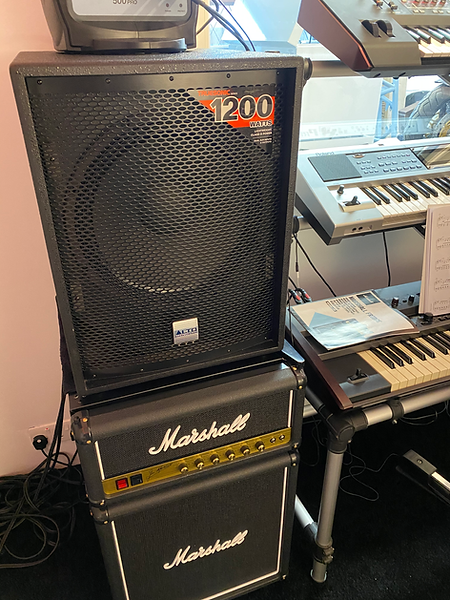
The photo on the left shows the workshop amplifier and the sub. I made the sub stand from 10mm alloy sheet, and mounted it on isolation feet so there is no vibration.
The hydraulic lift that has been refurbished and painted white. This is a Snap On product that I bought a while ago, but didn't really use. It has been modified to allow for motorcycle builds, and I made a plywood top which makes it wider for chassis builds, such as the TVR's or single seat racing car builds. It's a really useful addition to the workshop, and will feature in the coming projects. Below shows the new top fitted.


The main area of the workshop has been fitted with Mordant Short speakers, which give a good mid and high range, but of course no system is complete without a decent sub woofer. However, I had to find a place to house the sub and sitting it on the work surface of the cabinets wasn't ideal, so I made an alloy stand that has anti-vibration feet. It was painted gloss black and makes a bit of a statement while performing a vibration free sound.
The workshop needed its own compressed air supply, and running a long airline from the other workshop was too impractical. So I purchased a new compressor from my local Snap On dealer, but it was finished in grey. As the workshop colour scheme is white, the compressor had to match. It was shot blasted and painted the correct colour, and a set of green decals were made to match.


The roof area of the building is insulated, floored and completely sealed. A comprehensive heating/cooling system is installed which is explained below. In order to access the loft area, a ladder has been installed which retracts into the roof, and two hatches seal off the ceiling


Below are some of the keyboards set up in the studio with new cables and a separate mixer for the three Yamaha keyboards. The latest edition is the new MODX8+ on the bottom, a vintage DX7 in the middle and MOXF6 at the top. The idea is these keyboards can be used as a stand alone set up for gigs, without having to reconfigure any of the other keyboards in the main studio.
The picture on the left shows a Hammond SK1 at the bottom, a Roland JDXA in the middle and an AKAI MPK261 at the top.


All the keyboards have been wired with Mogami cables, which are supposed to be the best you can buy, I was little sceptical about these claims, so initially I only bough cables for the Hammond and the JDXA. The difference is absolutely astonishing, no noise or hiss and a much sharper sound. I then decided to do the rest of the studio, and now all the instruments are connected with these cables. The beauty of them, is they are all custom made to length and have colour coded ends, makes life easy when there are 14 inputs in the mixer.

A new edition to the mix, is the red Nord Wave2 which is a lead synth. I hadn't played a Nord before and was a little sceptical about buying it. My worries were unfounded, as it is an amazing instrument, and has been used very recently in a live gig with the band. On the floor underneath the Nord stack, you can see some loose 61 note organ keypads. These are made by the German company "Laukhuff", and will be used in a 4 manual organ that I am making. It is to be a replica of Hereford Cathedral's organ but with a modern console. I will upload the construction as it progresses.
The left hand video, shows the bronze bar being machined to size. Here the part that will become the threaded section, is being turned to a diameter of 22mm, before being screw cut with the new thread.
On the right, the hexagonal part of the plug is being made, the part set up on the rotary table, which makes the process straightforward.
Once the hexagonal part is completed, the piece is put back in the lathe, for the thread to be screw cut. This is shown below, and the finished plug fitted to the block.